The basics of mixing vocals
Blog by Jamie Hamilton under Recording & Production
25th November 2019

Earlier in the year, we shared some tips on recording vocals in a home studio. So you should be armed with everything that you need to capture the perfect vocal take. This, however, is only half of the battle when it comes to working towards a professional sounding end product.
There are certain things that you miss out on when not working with an experienced producer in a studio filled with shiny recording gear. Still, with time, effort, the right plug-ins and plenty of practice, it is possible to get a vocal recorded at home sounding close to industry standard.
Although I'll be using Ableton and various 3rd party plug-ins for this tutorial, you should be able to apply these techniques across all good DAWs without the need to buy additional software. There are countless different ways to go about mixing a vocal and there is always more to learn. Here, we aim to provide you with a few of the fundamentals for you to send you off on your way to mix mastery. We've even included some basic EQ, compression, reverb and delay settings to get you started. Ur welcs.
Editing: Cutting, Pasting & Automating
Before we get to the fun stuff, there is some cutting and sticking to do. Whilst this part of the process is unlikely to fill any producer with joyful enthusiasm, it's an important first step for a professional sounding vocal. Hopefully, you'll have a few vocal takes at the ready, as advised in the recording vocals blog. With a few different performances to choose from, you can begin by piecing together your favourite phrasings from each take.
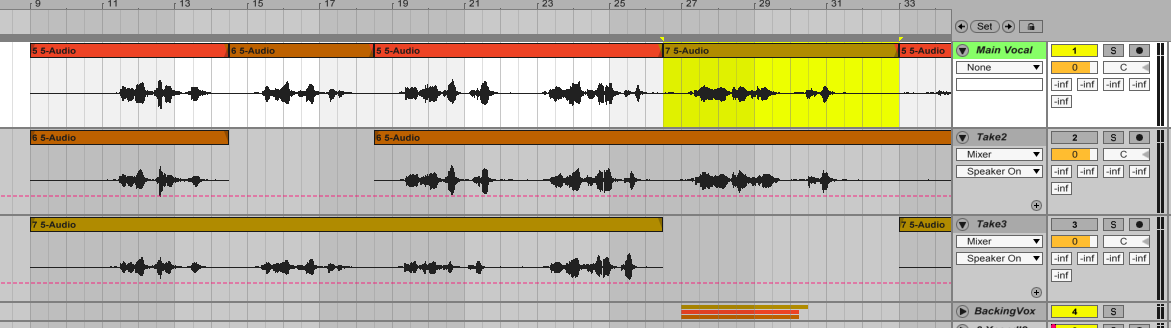
Once that's all sorted, you'll also want to remove any sections of the recording where the vocals drop out. Even in the unlikely event that your vocalist has stayed completely still, with no shuffling, sighing or dancing - additional noise can bleed into the microphone from headphones etc. and it is best to get rid of this early. You might opt to use a gate plug-in for this purpose if you're familiar with one—but be careful if you go down this route, as louder background noises will sometimes sneak through the gate and you could inadvertently cut out the quietest parts of the performance.
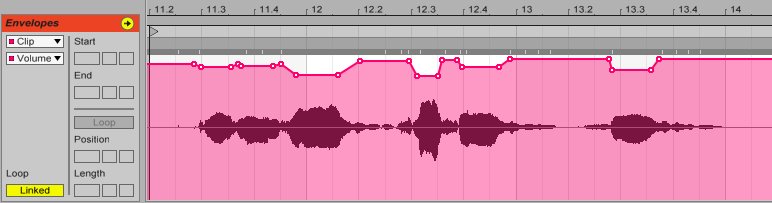
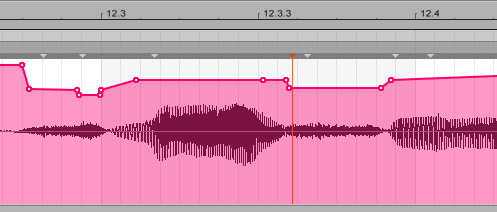
Although the vocal compression that we'll add later will go some way towards levelling out the volume of the performance, there is a lot of value in automating the volume of the vocal track. It is important that the phrasing is loud and clear and fairly consistent throughout, and using the volume fader is the most accurate way of achieving this. In the digital era, it is tempting to adjust the fader visually as you move across the waveform but this isn't a good idea. Be thorough, and use your ears rather than your eyes.
Whilst I don't use too much automation when processing vocals, this is mainly because I quite like the character of a compressor working a vocal. Some producers prefer using lots of automation for a more natural result.
EQ Cuts: Cleaning The Spectrum
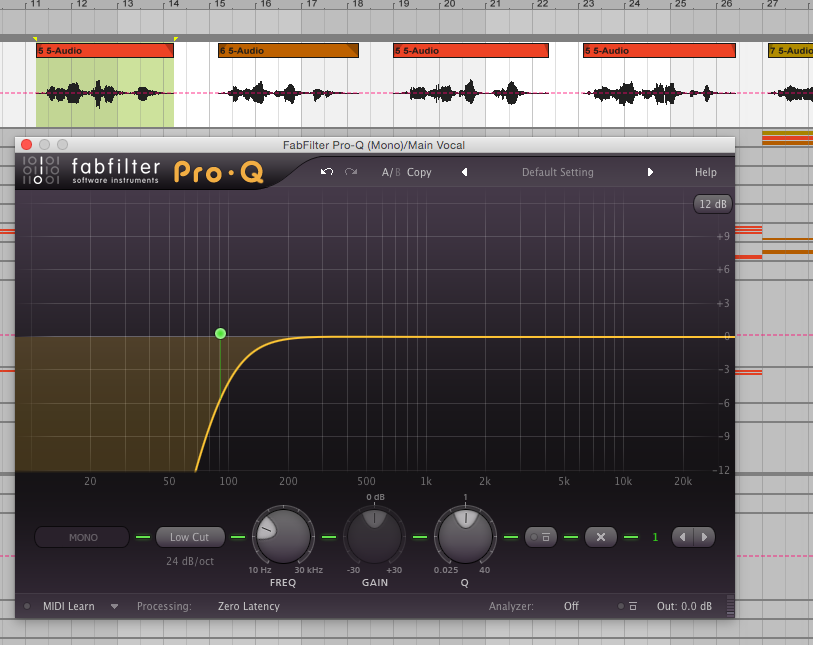
Generally, it is best practise to make any EQ cuts before applying any compression to a track. This limits any troubling frequencies that we want to hear less of being magnified with the rest of the track, in turn giving the compressor a little bit less work to do.
The most common EQ cut used on a vocal is easy to execute and goes a long way towards cleaning up the track. A simple high pass filter applied around 80Hz-100Hz will remove a lot of unnecessary low frequency energy from the signal. The best technique for finding the 'sweet spot' when applying the filter is to move the low-cut slowly upwards through the frequency spectrum until you start to notice its effect on the tone of the vocal. At this point, dial back a little until you're sure that you have cut the extraneous lows without undermining any warmth and fullness in the voice.
Even in a very well recorded, well delivered vocal, there may also be one or two additional 'trouble frequencies' that periodically poke out of the mix. The best way to pin down the exact location of the offending frequencies is to set a narrow peak (Q) on your selected EQ and sweep through the bands. Some EQ plug-ins allow you to solo the frequency that you're working on, otherwise, try boosting the frequency significantly as moving through the spectrum. Whenever you reach a region that sounds particularly harsh or unpleasant to your ears, cut that part of the signal by a few dB. Repeat this as you move through the bands, being sure to check the before and after effects of your work.
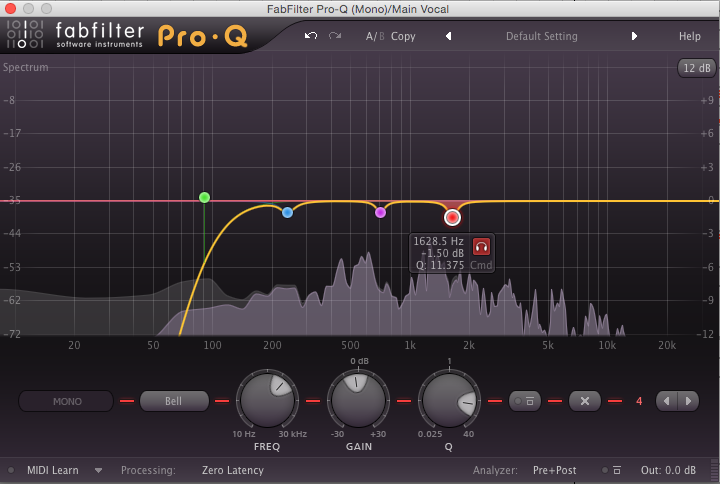
It is easy to overdo it when applying cuts, so tread carefully. Make sure that your changes don't result in an unnatural or 'thin' sound. If the vocal already sounds good to your ears, then don't feel that you have to make cuts for the sake of it.
Here is a rough idea of what to expect across the frequencies. The below can vary widely across different recordings and voices but it is good to have a starting point to work from:
- High pass filter up to 80Hz-100Hz: Removes low rumble and noise
- Narrow cut(s) in 250Hz-400Hz band: Remove 'muddiness'
- Narrow cut(s) in 450Hz-700Hz band: Remove 'boxy' tones
- Narrow cut(s) in 1kHz-4kHz band: Remove 'nasal/honky' sounds
- Narrow cut(s) in 5kHz-10kHz band: Remove 'siblant/sizzle' sounds
Compression: Squeezing The Signal
Although not necessarily compulsory, compression is used commonly on most commercial vocals.
So, what exactly does a compressor do? As you apply more compression to a signal, you are reducing the gap (dynamic range) of the loudest and quietest parts of the audio—usually by attenuating the louder signals and/or boosting the quieter signals. The result on a vocal is often to keep it sounding 'up front' in the mix. Depending on the type and amount of compression used, the outcome can be a subtle levelling of a performance or the heavily processed sound favoured by some styles of Pop, Electronic, Hip-Hop and Hardcore.
Generally, especially when first adapting to using compression, using sparingly is the safest option. If you have automated the volume as we've suggested earlier, then the track should already be reasonably controlled. This may be enough for an acoustic track or a sparse arrangement but a touch of compression can be pleasing to the ear in most styles.
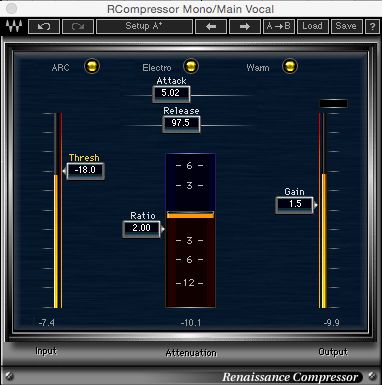
Start off with a ratio setting of 2:1 to 4:1, a fairly fast attack of 5ms to 10ms and a release time of 30ms to 100ms. You will then want to adjust the gain reduction accordingly. Watch the meters and try not to apply more than 4dB of gain reduction for a transparent sound. As these settings can sound fairly subtle to an untrained ear, it is a good idea to experiment with your plug-in to work out the sort of effect that you're applying. Dial in some settings and crank up the gain reduction—listen to the results and note how the sound is shaped. Here are the starter settings and some pointers for the different parameters:
- Ratio: 2:1-4:1 (set higher for more compression)
- Attack: 5ms-10ms (higher setting for more 'punchy' sound)
- Release times: 30ms to 100ms (faster delivery generally requires a faster release time)
- Threshold: around -24dB (lower threshold for more compression)
- Gain Reduction: 2dB-4dB (set higher for more compression, take it easy)
- Knee: Some compressors have hard/soft knee settings (start with soft knee for a more transparent sound)
- Makeup Gain: around 1dB to 2dB (use your ears and match to the pre-effect level)
EQ Boosts: Subtly Does It
Now that we have a pleasingly level signal and any harsh frequencies have been tamed, we can consider careful boosts to certain frequencies. I'm a strong advocate for the 'cut, rather than boost' school of thought—if I'm keen for an element to stand out in the mix, I'll prefer to make cuts to other instruments competing around that frequency, rather than applying boosts to a single track. However, this is a matter of opinion and a subtle boost here and there can still be effective.
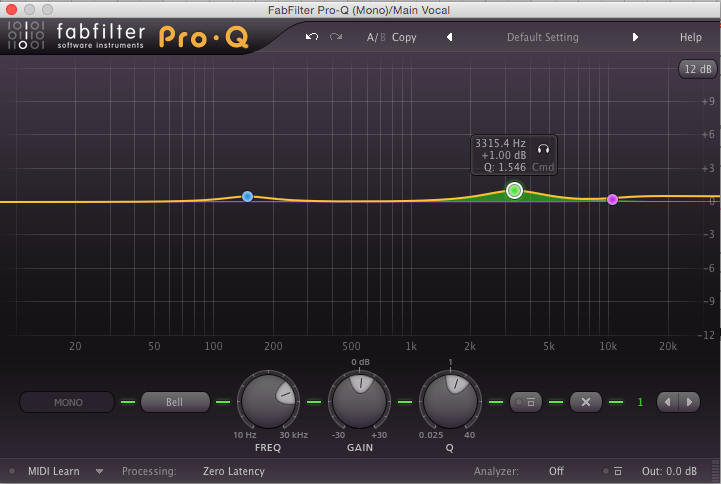
A general rule when boosting and subtracting EQ is to cut narrow and boost wide. So, whereas we used a narrow Q to make cuts earlier, a wider peak is required here. Some common areas to apply boosts to a vocal are listed below, as with the cuts—don't overdo it. A small boost of 1dB to 2dB at a Q setting of 1 to 1.5 is often more than enough.
- Wide boost in 150Hz-250Hz band: Apply 'warmth'/thicken 'thin' vocal
- Wide boost in 800Hz-1kHz band: Apply 'clarity' to phrasing
- Wide boost in 3kHz-4kHz band: Apply 'presence/openess'
- High shelf boost of 0.5dB-2dB starting from 6.5kHz to 12kHz (boosting from higher frequency is more subtle): Apply 'air/sheen'
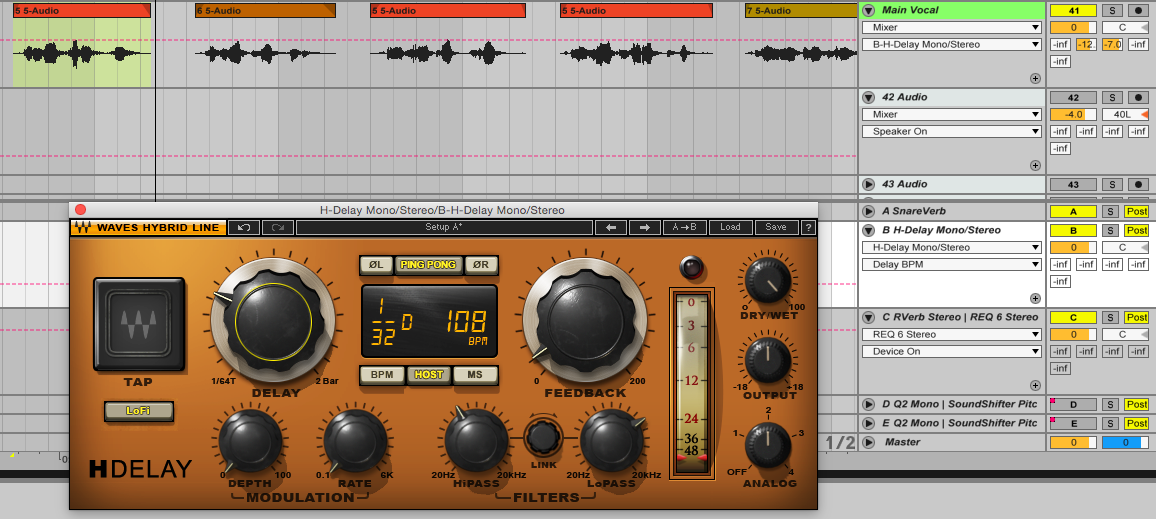
Reverb/Delay: Creating A Space
The most obvious effects applied to a vocal track are spatial effects: delay and reverb. Although I'll be providing some pointers on basic settings, the best advice I can offer here is to work with the presets. You'll already have an idea of the sort of space you want to create in your recording, and most plug-ins have a long list of pre-programmed settings to get you started. I'd also advise using a send track for your reverbs/delays. Having the effect sent to a separate track and setting the 'Dry/Wet' parameter to 100% wet allows for much more control than placing the plug-in on the same track as the audio.
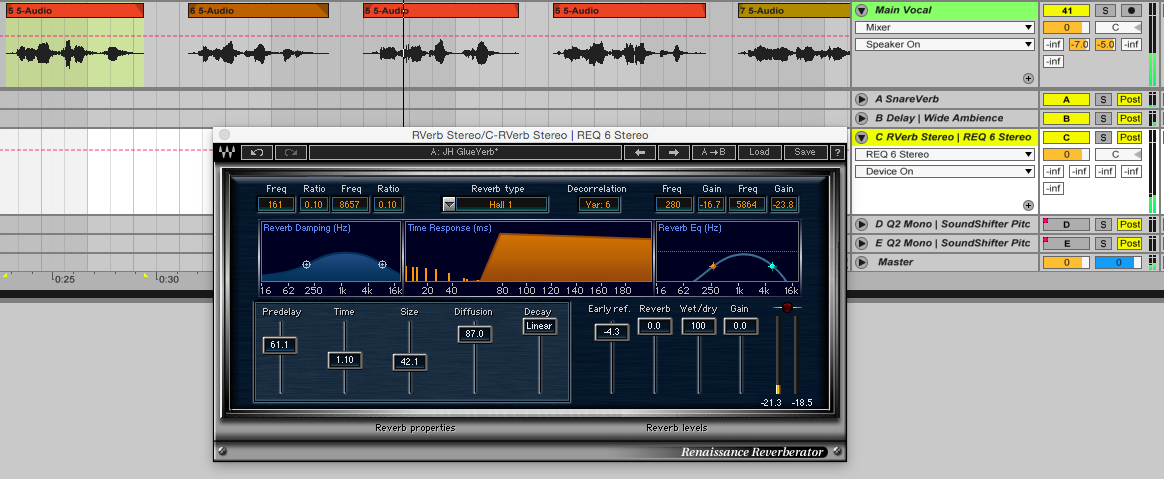
This is an area that probably allows for the most creativity of any element of the vocal mixing process, so have think carefully about the sort of sound that you're aiming for. Listen to to your favourite tracks and work out what sort of reverbs and/or delays that they are using—this will make recreating a certain effect easier when you get down to it.
A common aim with these effects is to retain the immediacy of vocal whilst adding an element of space. The key to achieving this sound is to use the pre-delay parameter on a plug-in and apply some EQ treatment to the reverb.
Put simply, pre-delay recreates the real-life effect of a noise bouncing off a distant wall. So as you increase the pre-delay, you are building a bigger virtual space. You can start at 30ms for a small virtual space and move up to, say, 120ms for a huge, cathedral-like environment. Tweak this setting until you have the sort of space that you imagined. It isn't always necessary, but it is possible to use the power of mathematics to time your pre-delays to a track's BPM. Or, if you're lazy like me, by using handy tools like this this one.
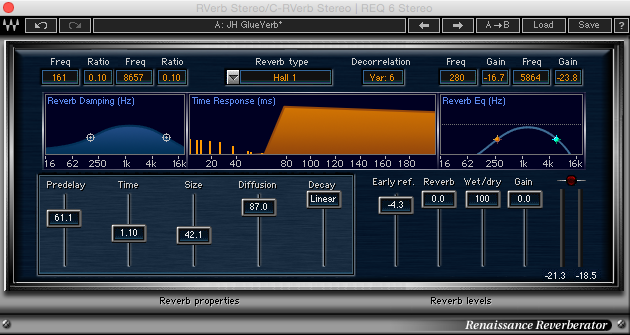
You can also roll some high end off the reverb to make it less intrusive using an EQ plug-in. If you're looking for a more obvious, bright sounding reverb, you'll want to keep the high frequencies intact. It is, however, always a good idea to employ a low cut on your reverb to prevent it from muddying the lows - use your ears to judge this, between 150Hz and 200Hz is a nice starting point.
Stereo delays are sometimes used in addition to (or even instead of) reverbs to create some extra drama to a vocal track. This will often be controlled by delay and feedback settings, with less feedback generating a 'dryer' delayed sound. Again, if you're looking to add some delay to a vocal, have a play around with your selected plugin's presets. From slapback delays to spacious, long delays—find something close to the sound that you're aiming for and tweak accordingly.
Just as you vary the level of your main vocal throughout the song, you'll probably also want to automate the volume of your reverbs and delays. These effects can get lost easily in a busy mix but cranking them up for the full duration of the track can make the quiet sections sound overdone. Automate the spatial effects accordingly if this is the case, or even use different settings all together in the quieter parts to enhance intimacy.
De-Essing: Controlling the 'Sss'
The final plugin that I tend to add to a vocal track is a de-esser. This type of plug-in uses multiband compression (a compressor that acts only on a selected frequency range) to limit the volume of the 's' sounds (sibilance) that can sometimes sound a little harsh in a recording. The sounds usually occur somewhere in the 4kHz to 7Khz range. It is difficult to target these sounds using subtractive EQ as this would reduce the volume of everything in these frequencies, taking a lot of the brightness and clarity if the vocal with it.
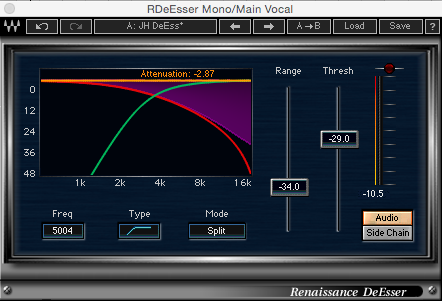
Again, start with your plug-in's presets and remember that we're only trying to tame any overly obtrusive hissing, so don't go too far with the range/threshold settings. Too much attenuation can create 'lisping' side-effects and make the phrasing of any sibilant words less clear.
If you don't have access to a de-esser plugin on your DAW, it is possible (and sometimes more transparent) to reduce any overly loud sibilance using automation. Simply lowering the volume of the signal at the offending syllables will do the trick nicely.
Whilst there's a lot to take in on one sitting here, the aim is to make the basics a little less scary so that you can get stuck in with some experimentation. As you become more confident in using the above techniques, you will find yourself trying new things and learning what works best for you. There are no 'correct' answers when it comes to music production. So, whilst having reference points is useful as you learn, keep checking in with the most important tool you have as a musician/producer—your ears.
ALSO READ:
5 of the smallest audio interfaces for musicians with limited room
5 Best Audio Interfaces for Recording at Home on a Budget
Home recording tips - Advice on recording vocals in a home studio
Tags
Advice on home recording and mixing vocals

.jpg "Source: https://www.instagram.com/p/DYVPm-3Opkm/")